
So, what is all the fuss with DMARC when we already have SPF in place? Aren’t we already validating the sending SMTP domain? The answer is; yes and no. The SMTP domain is only being partially validated.
This is meant to be a “how to” tutorial and by no means a detailed explanation on how DMARC functions, but there are plenty of blogs and information available on the Internet if you want to go deep into the subject.
There are many additional features in DMARC over SPF but in short:
- SPF validates the “Mail From” address (5321.MailFrom) against spoofing.
- DMARC validates “From” address (5322.From) against spoofing.

If both SPF and DMARC are not set there is a good chance your domain will be automatically flagged as a suspect email sender by other organizations. Traditionally email hygiene filters have been validating on SPF alone, but more and more are beginning to incorporate DMARC in addition to SPF and rightfully so.
There is some help on these settings when you are using Office 365, from the Microsoft 365 admin center under Setup -> Domains.
- Exchange admin portal will provide the SPF Settings for SMTP egress on Office 365.
- Exchange admin portal can NOT provide the SPF Settings for SMTP egress elsewhere.
- Exchange admin portal can NOT provide the DMARC Settings for SMTP egress anywhere.

So, with this information we can only setup SPF for just sending email from Office 365. So, what about the on-premises SMTP or other cloud-based relay servers using our domain for some of our line of business systems? We would need to add the DNS (A) record or IP address of the egress SMTP service to the SFP record for the domain.
In this case we have a single additional on-premises SMTP relay service for a “scan to email” business process. The SMTP traffic is outbound only, with no MX record associated. Simply just an A record with the public FQDN of the service and any PTR record in place by the ISP. The PTR record doesn’t have to match the FQDN of the A record. In most cases if the ISP provide any PTR record, we should be fine.
The NSLOOKUP output should look something like this:

After validating the A record and the PTR record for the SMTP relay service we will now add the PTR TXT record to the DNS zone file. In this case we are adding and additional A or IP statement.
Once the SPF TXT record is in place and have propagated to other DNS servers (please wait up to 24 hours in some cases), your NSLOOKUP output will now look like this:
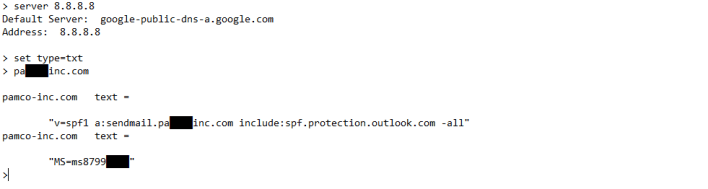 Some people prefer to use the IP4 address instead of the FQDN of the SMTP relay service, in that case the output from NSLOOKUP will look like this:

Now, onto the DKIM and DMARC piece. DKIM attaches a signature to the outgoing email header and DMARC on the receiving side queries a public key in DNS to assure it matches the original signature.
The first part is to setup a couple of CNAME records for each server and you will need:
- MX FQDN provided under the Microsoft 365 admin center under Setup -> Domains.
- FQDN of the additional SMTP relay service you are using for the domain.
Host name:
selector1._domainkey.<domain>
Points to address or value:
selector1-<domainGUID>._domainkey.<initialDomain>
Host name:
selector2._domainkey.<domain>
Points to address or value:
selector2-<domainGUID>._domainkey.<initialDomain>
- selector will always be “selector1” or “selector2” for Office 365
- domainGUID is the same as the domainGUID in the customized MX record.
- initialDomain is the domain is your xxx.onmicrosoft.com domain.
Once the CNAME records are in place and have propagated to other DNS servers (please wait up to 24 hours in some cases), your NSLOOKUP output will now look like this. Note that I am setting the “type=txt” in NSLOOKUP to check the CNAME record as it ultimately resolves in a TXT record:
 Next step is to enable DKIM signing for your custom domain through the Office 365 admin center, which is straight forward:
- Sign in to Office 365 and navigate to the Exchange admin center.
- Go to the protection page and click the DKIM tab in the top ribbon.
- Select the SMTP domain and click enable

If you try to enable DKIM in the Exchange admin center before full DNS propagation has taken place, you will get and error message that the CNAME records that we just created are missing. Please wait up to 24 hours after creating the CNAME records until enabling DKIM.
Confirm DKIM signing is properly configured:
- Send a message from the newly enabled DKIM domain to another email account such as outlook.com or another Office 365 hosted email domain.
- Open the message and look at the header. The DKIM-signed message will contain the host name and domain you defined when you published the CNAME entries.
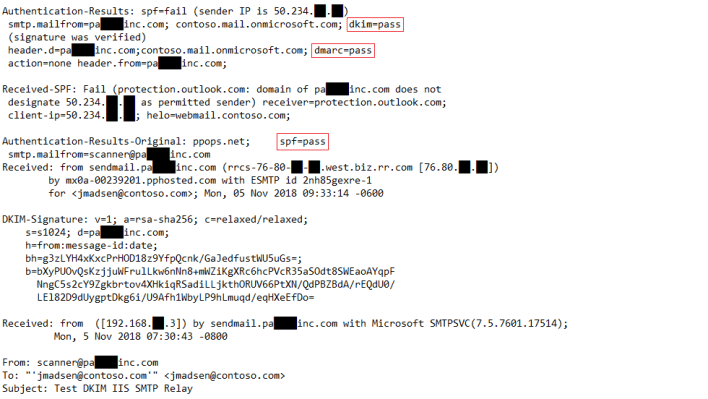
- Look for the Authentication-Results header, which should include “dkim=pass” or “dkim=ok”. Also validate “dmarc=pass” or “dmarc=ok”

This is great, we have now configured DNS and Exchange Online to use DKIM, but what about the on-premises IIS SMTP relay service? Since IIS doesn’t natively support DKIM, I am using a third-party tool to allow for DKIM. In this case I am using “DKIM for Exchange Server and IIS SMTP Service” by AdminSystem. A full tutorial can be found here: DKIM in IIS SMTP Server – Tutorial
After installing the product, configuring the sender domain and exporting the public key, I end up with a DNS TXT record with the public key to publish in the DNS zone file. This step is not necessary with Office 365 as we are using Microsoft keys. The public key for the email DKIM signing does not have to be from a public certificate provider and we can use the self-generated key done by the software add-on.
Once the public key TXT records are in place and have propagated to other DNS servers (please wait up to 24 hours in some cases), your NSLOOKUP output will now look like this:

We have now enabled DKIM on the IIS SMTP service and can validate this like we did above for Office 365 by sending a message from the newly enabled DKIM IIS SMTP service to another email account. In this case you will also notice an “spf=pass” under Authentication-Results-Original signifying the sending SMTP IIS service also passed the SPF check as well.
Finally, we need to setup the actual DMARC DNS TXT record to set the policies for our sending email domain and how the DMARC enabled recipient should act upon email from our sending domain if the DMARC validation fails.
Host name:
_dmarc.<domain>
Text Value:
v=DMARC1; pct=100; p=<policy”
- domain is the domain you want to protect.
- pct=100 indicates that this rule should be used for 100% of email.
- policy for failed validation can be set to none, quarantine, or reject.
Before fully deploying the solution, the policy should be set to “p=none” during testing not to inflict damage on yourself if there is a problem and the policy is set to reject. Once all relay services for the domain and testing is done, change the TXT record to reflect the “p=reject” for fullest compliance and to pass the DMARC validators out there.
Beware that the moment the policy is set to reject or quarantine, it specifies what will happen at the receiver of emails sent from other services using your domain without DKIM. These services could be line of business systems, marketing systems, email blast platforms, monitoring systems, etc. You will need to account for all services that are sending e-mail under your domain and assure they are DKIM enabled and if not provide a DKIM enabled IIS SMTP relay server in the middle or relay off Office 365 as it provides the DKIM.
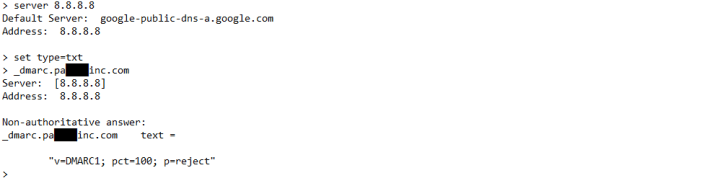
Once the DMARC TXT record is in place and have propagated to other DNS servers (please wait up to 24 hours in some cases), your NSLOOKUP output will now look like this:
That’s it! There is absolutely no excuse to not protect your domain with DMARC. If I can wrap my head around this over a lazy Sunday not having worked with email systems for about 5 years, you can do it too.
